Deep Water Culture (DWC) is the best hydroponic system for beginners
because is the easiest type of hydroponic system that you can build and maintain at home. In this system, the plants grow with their roots submerged directly in nutrient-rich water. For home growers, this can be achieved by growing in large opaque storage containers or buckets. Commercial growers use rafts which float on a large bed of water; these work like a conveyor belt with young plants added on one side, they will move along until ready for harvest at the other side.

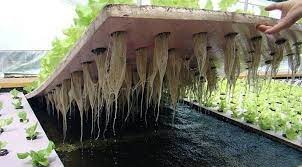
A Deep Water Culture System
The lack of moving parts or recirculating water makes DWC systems relatively simple and cheap to build. The water in DWC systems does not recirculate, it remains sitting in the reservoir for the entire duration of the plant’s life. This means you must aerate the water to replenish oxygen that is used by the roots.
In soil, air pore spaces provide the much needed oxygen for roots and in recirculating hydroponic systems, water is aerated in the process of being pumped around. We can remedy this in a DWC system by using an air pump with an air stone attached (used in fish tanks) to ensure the water remains oxygen rich.
What can I grow in my DWC system?
The best crops to grow in DWC systems are Lettuce, Kale, Chard, Bok Choy, Basil and Parsley. These are all plants which are not too top-heavy. In DWC systems the roots are not well anchored and that means growing tall plants like tomatoes can be difficult, if you do grow them, you’ll need the right supports to keep the plant upright.
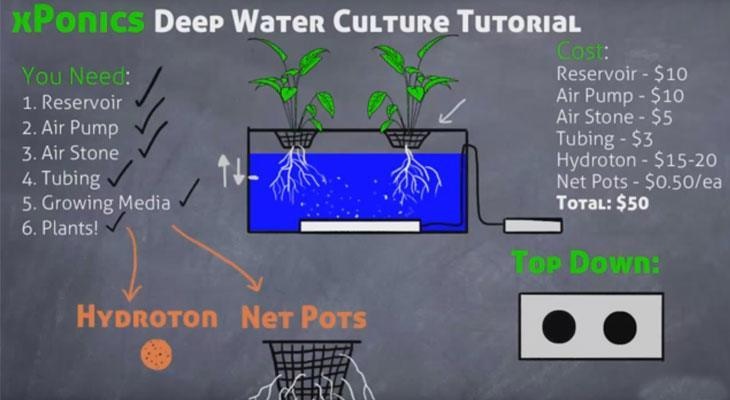
How to make a DWC hydroponic system at home
Materials and Approximate Cost:
-
Storage container or bucket
-
Net pots
-
Airpump with air stone
-
Tubing
- Growing Media – Hydroton or Foam
-
Hard Water Liquid Nutrients (A & B)
-
Vitalink pH Down
-
pH meter
-
Measuring beaker
-
Pipettes
-
Hole saw with arbor
-
Drill
Method:
1. Find a suitable container for the system
Many find that deeper storage containers and buckets work well for these systems because the deeper the reservoir of water, the more stable the nutrient solution will be. Fluctuations in nutrient concentration and pH are more likely in smaller reservoirs, you will also have to top up the water more regularly.
Light should not be able to penetrate your container, otherwise there is a high risk that algae will grow in your water.
2. Drill holes into the lid of the container
The plants will grow in net pots, these are pots with plenty of holes for roots to grow through. The next step is to drill holes into the lid of the container where the net pots will sit. This requires the only specialist tool you’ll need in this build, a hole saw, these are quite affordable and easy to use. The size of net pots you use must be larger than the hole so they don’t fall through.
If you’re using a wider container drill multiple holes. It’s important to plan carefully here: holes 15cm apart to accommodate for the size of the mature plants. If you’re using a 20l bucket, drill one hole in the centre to make a single plant system (they’re great for growing something larger like tomatoes or courgettes).
Pro-Tip: Place some wood below your lid when you drill your holes, this will prevent the saw jolting and breaking the plastic.
3. Assemble your air pump
-
The air pump must remain outside of the reservoir. It will come with a check valve, this ensures that the pump does not suck water back up if it is turned off. If it does not come with one, you must keep the pump above the water level.
-
Connect the air stone and check valve with a length of tubing, ensuring the arrow on the check valve faces the air stone. Then connect the check valve to the air pump in the same manner.
4. Fill the reservoir, add nutrients and adjust the pH
-
The system can be quite heavy when full, so make sure you decide where your container will live before filling it up! Fill it almost full with water, leaving 1-2cm of space at the top.
-
Next you need to add your hydroponic nutrients to the water, following the instructions on your bottle. Mine advised me to add 2ml per litre of each A and B nutrients; using a measuring cup I added 110ml of each into my 55l container.
-
We also need to adjust the pH of the water. Using a pH meter, measure the pH; tap water will be anywhere from 6.5-7.5 pH. Most vegetables and herbs require a slightly acidic nutrient solution.
-
You can bring the pH down to 5.5-6.5 with drops of phosphoric acid using a pipette (commercially sold as ‘pH Down’ for hydroponic use). Wear gloves when handling pH down and remember to mix the solution well after application.
-
Plug in the air pump and place the air stone in the reservoir. Secure the lid on top and you’re almost finished.
-
Adding your plants is simple, I placed some plants grown in rockwool plugs into the net pots. You can use seedlings grown in soil too but we advise using a medium that doesn’t make a mess. Rockwool plugs or hydroton clay pellets are a cleaner solution.
All done! Now for some maintenance must-dos.
DWC Hydroponic System in Action
-
It’s very important to ensure the water level doesn’t drop too much, especially when the plants are young. As long as the water has sufficient contact with the roots they should grow well.
-
Keep an eye on the pH levels by checking it every time you top up water.
-
I use an old 2L water bottle to top up my water so I know exactly how much water I am adding. For every 2L of water I use, I add 4ml of each A & B nutrient into the reservoir.
-
Clean the reservoir and replace it with fresh water every 14-21 days.

Additional Tips
How to sow seeds directly into your DWC system
-
If you don’t have a way of propagating young seedlings, you can directly sow seeds so they germinate in the system.
-
To do this, place a rockwool plug into a net pot and place a seed or two into the plug. Ensure that the plug does not dry up at all or this could affect germination.
How to grow cuttings in your DWC system
-
You can also experiment with growing herb cuttings, I tried it with a mint cutting using a foam collar. It’s a sponge cylinder with a slit down the middle which you can wedge seedlings or cuttings into, I got mine free with the net pots.
-
I cut a mint stem under a leaf node, and then removed the bottom leaves and placed it into the foam collar and then net pot. Placing a bottomless plastic bottle over the cutting is advised to prevent it drying up.
So that is how you can build a simple hydroponic system for yourself at home. You may already have some of the materials in your home right now, an old storage container or bucket can be repurposed in a worthy effort to start growing from home. If you don’t have a lid, you can cut holes out of a sheet of polystyrene packaging for plants to grow from.